I am so excited to again be pairing with some of my best blogging pals and Cutting Edge Stencils for this month’s Create and Share Challenge! Thank you to Cutting Edge for supplying the stencil. As always, all opinions are my own.
2. Refashionably Late ~ Christmas Pillow
3. Tastefully Frugal ~ Christmas Tree Ornament Shadow Box
4. Pocketful of Posies ~ Reclaimed Holiday Wall Art
5. Domicile 37 ~ Edgy Reindeer Tapestry
6. Casa Watkins ~ Noel Stenciled Planter Basket
7. Creatively Homespun ~ DIY Rusty Reindeer Wall Art
8. Around the Watts House ~ Holiday Tote Bag
9. Penny Love Projects ~ Window Wall Rack
10. Flourish and Knot ~ Stenciled Table Runner
11. Old House To New Home ~ DIY Chalkboard Merry and Bright Sign
12. Up To Date Interiors ~ Noel Basket
13. Our House Now A Home ~ Rustic Reindeer Canvas Wall Art
14. The House Down The Lane ~ Reindeer Wall Art with Lights
15. Green with Decor ~ Christmas Craft with Stencil and Frame
16. Pretty Practical Home ~ DIY Hot Cocoa Tray
17. A Shade of Teal ~ DIY Christmas Tree Glitter Sign
18. Uncookie Cutter ~ Hanging Ornament Boards
19. One Mile Home Style ~ DIY Stenciled Scrap Wood Holiday Art
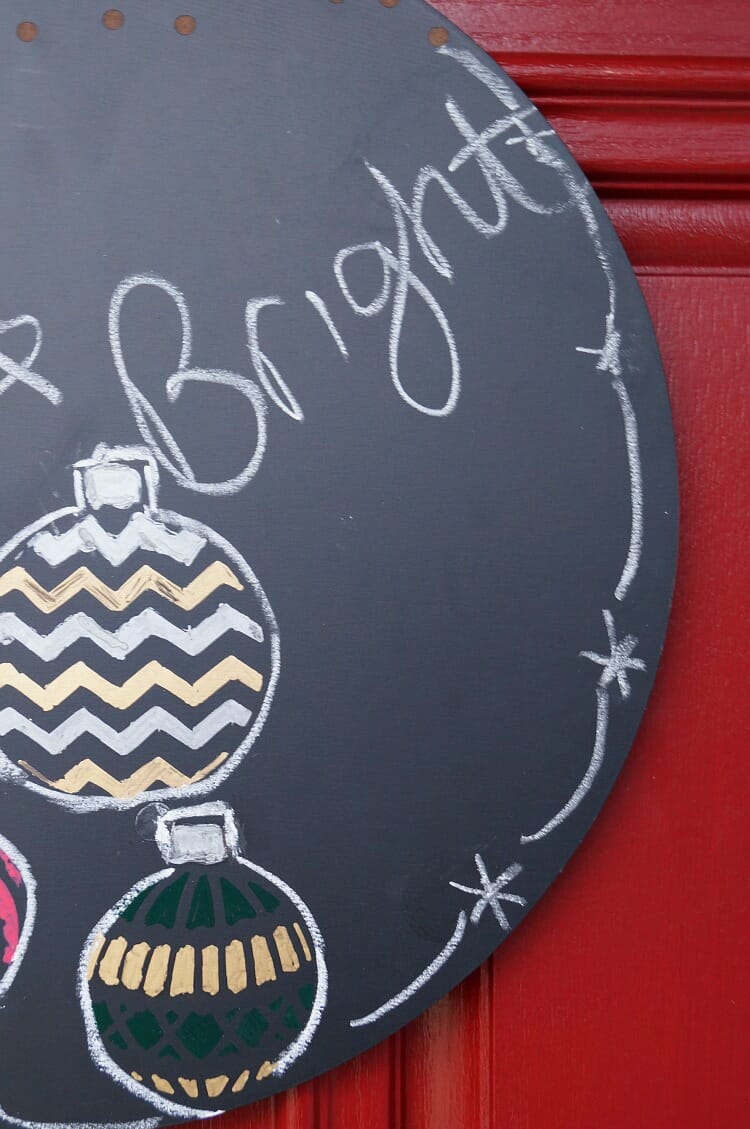
I have a confession about this tutorial. The project I am sharing with you today is actually my second crack at using this three ornament stencil. My first project turned out bad, really awful. After spending a few days pouting about the wasted supplies, time, and money, I regrouped and decided on going a different route. Luckily, this DIY Chalkboard Merry and Bright Sign turned out much better than my first attempt!
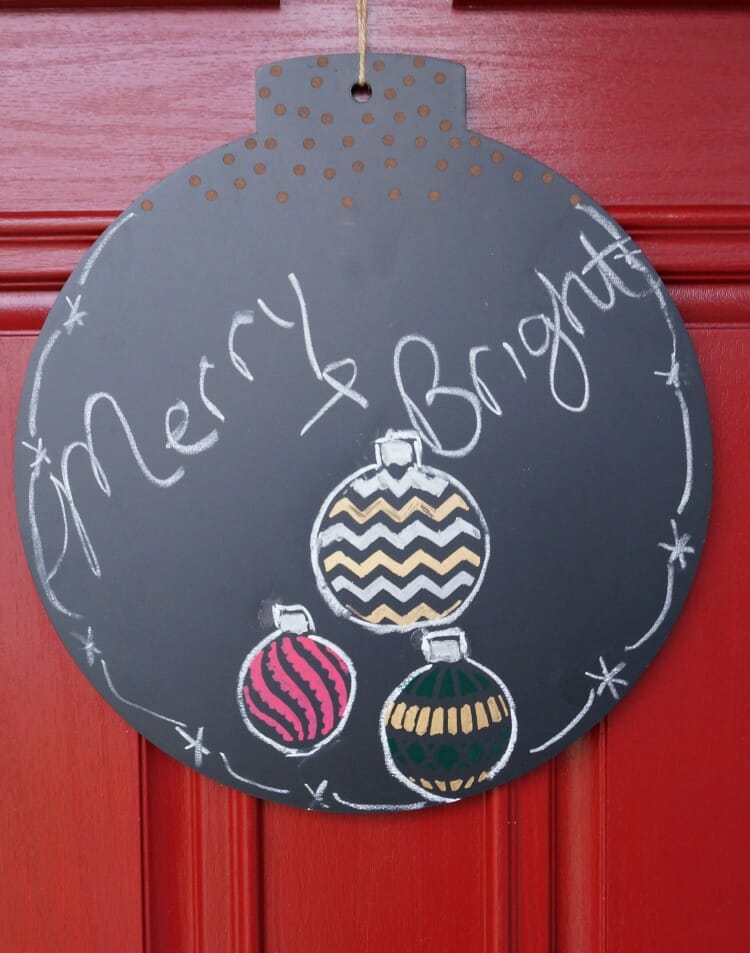
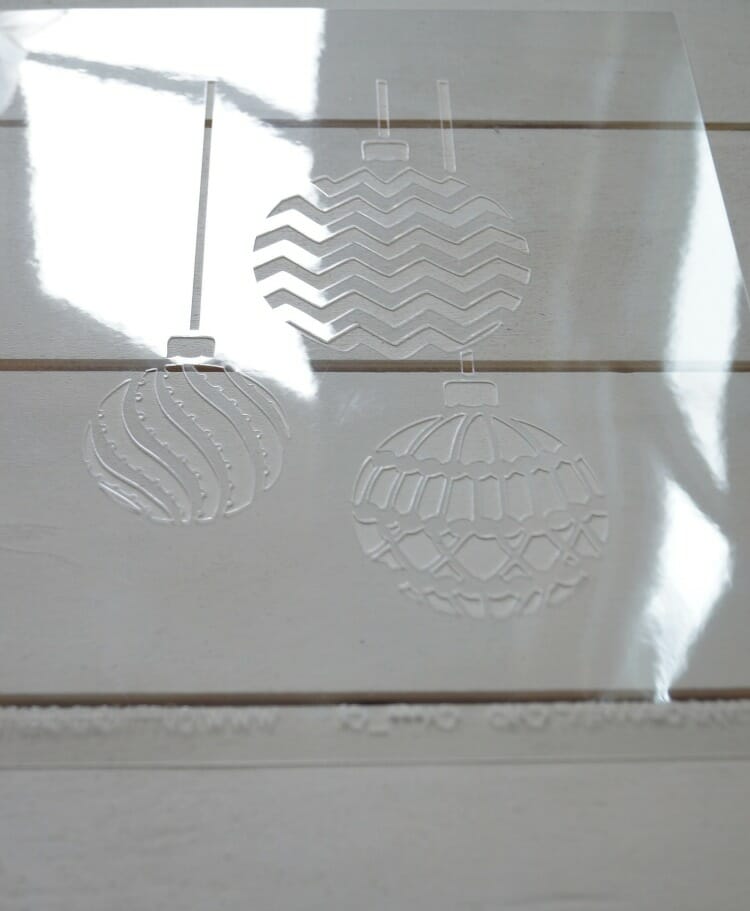
Here’s my true failure though. I was so disgusted over the first project that I forgot to take any pictures of the process with the chalkboard sign. This is easy though, so I think you’ll get the jist! Here is a picture of the stencil from my first attempt. This is my second time using an Cutting Edge Stencil and they are so easy to use!
Here’s what you need
A chalkboard sign from the craft store-I got the one shaped like an ornament in the Christmas section
Paint Pens
A Cutting Edge Stencil
White Chalk
Position your stencil wherever you like on the chalkboard sign. Tape it if you are worried about sliding. Use your paint pens and fill in all the stencil. Let dry for 10-15 minutes and then go over it again to fill in any spots you may have missed.
Remove stencil and then let dry completely.
Use a white piece of chalk and write whatever message you like. Since this is going on our door, I debated between Merry and Bright and Welcome, but you can see what ultimately won out! I also drew a snowflake like pattern around the edges just to add a little more pizazz. My sign was already strung with a piece of twine which made for easy hanging.
And that’s it! Simple and easy!
I rarely take the time to enter Rafflecopters but I’d love to try these stencils. Also, you girls are all pretty inspiring so I’m looking forward to your pinterest boards. 🙂
I love this! Seems pretty easy, and I love that you can change it up easily with the chalk surrounding the ornaments. So fun!
This is simple and cute!!! I like that you’re able to switch it up easily too!
Great project, Amanda! I like the colors and the fact that you can change the greeting if you choose. So much fun!
Amanda, this turned out so cute!
Amanda,
I’m so sorry your first project didn’t work out but its only because this adorable sign was waiting to get out! I think it turned out great! Thank you so much for sharing! I’m pinning your idea!
Cat
What a fun idea to use a chalkboard sign! How fun!
Cute idea! Never would have thought to use a stencil on a chalkboard but it makes perfect sense! It looks great!
This is so cute! Great idea to use paint pens!
Love the play on ornament idea and chalk is always difficult to use in a diy, but you did a great job. My kids would have a ball with chalkboard!
Nice Amanda!! Love the ease of the project and it’s really pretty with the paint pens.!! Pinned and shared.
Thank you for pinning!
This is so fun! Such a great way to pretty chalk art.
This really turned out great!!! The possibilities for chalkboards are endless… I love that! I’m so excited to see how fast this challenge is growing! I’m so glad you’re a part of it!! xo!