You can finish bare walls effortlessly by building a cohesive gallery wall with mixed frame sizes, incorporating vintage art, and adding seasonal texture through soft ribbon accents to create a curated, lived-in aesthetic.
These straightforward methods transform empty spaces in older homes without requiring a renovation budget or professional interior design expertise.
Using paper templates for layout planning and plaster-safe hanging techniques ensures a secure, balanced display that enhances your room’s natural architectural charm. There is a particular kind of charm that lives in older homes.
It is the kind of character found in original woodwork that no one makes anymore, door hardware worn smooth by decades of hands, and floors that creak in just the right places.
These homes have personality built in, except sometimes on the walls.
If you have ever stood in a beautiful room that still felt somehow unfinished, you are not alone. Bare walls in a charming house represent a common decorating puzzle, often accompanied by hesitation.
Fortunately, finishing your walls requires just two core elements: framed art that feels intentional and soft accents that bring the space to life.
Whether you are arranging picture frames from Americanflat for an organic layout or incorporating high-quality textiles like Michelle’s aDOORable Creations’ Farrisilk ribbon to add dimension, budget wall decor, and vintage home styling can easily coexist.
Build a Gallery Wall That Feels Like You (Not a Showroom)
Start With the Right Frames and Mix Them Up
The fastest way to make a gallery wall feel stiff is to match every frame perfectly.
Uniform frames read as a showroom display rather than a lived-in home, and that is especially true in older houses where everything else has texture and variation built right in.
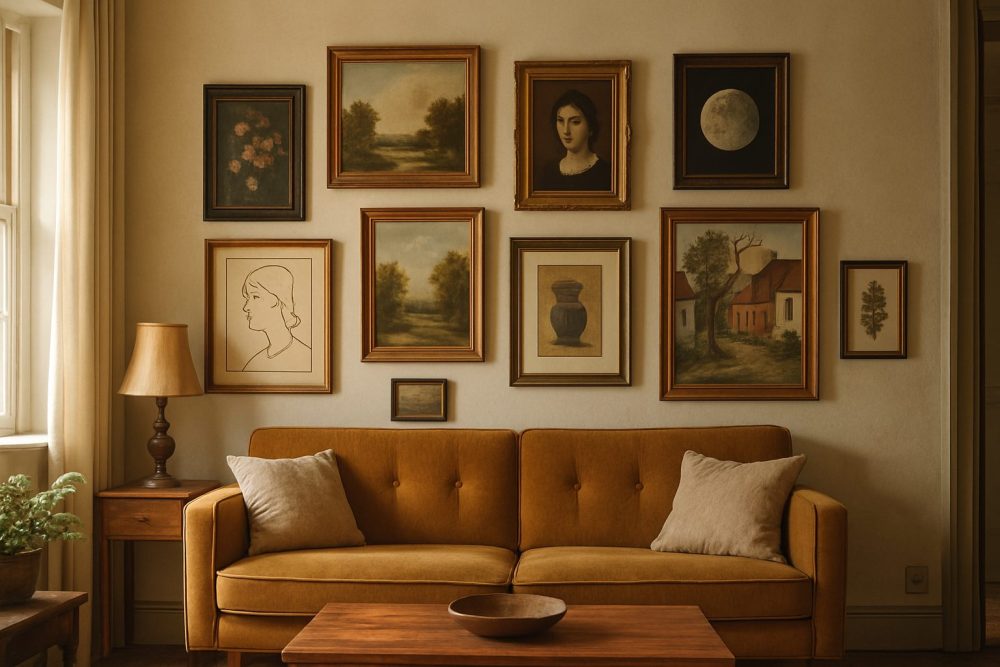
Mixing sizes is the secret to a dynamic arrangement. A large horizontal frame anchoring the center, a couple of medium verticals on either side, and a small square or two tucked into the gaps creates an arrangement with energy.
It tells a story. Matching sets whisper “store-bought”, while mixed frames say “curated over time”.
When it comes to finishes, older homes offer a natural guide. Look at your existing hardware for inspiration. Matte black, antique gold, warm natural wood, and aged silver are all finishes that complement vintage architecture without competing with it.
Rather than committing to one finish across every piece, choose two or three that work together.
A mix of matte black and warm wood feels collected and intentional. Antique gold paired with aged silver nods to the layered patina of an older home without trying too hard.
Quality matters here, too. Affordable does not mean basic, and well-made pieces will anchor a gallery wall beautifully without breaking your budget.
Choose Art That Means Something (Without Overthinking It)
There are no rigid rules about what belongs on a gallery wall. Family photos are an excellent starting point, particularly for older homes where warmth and history are already part of the atmosphere.
Printing a handful of your favorites at different sizes adds visual interest naturally. Mixing color and black-and-white portraits is a wonderful way to create depth.
Pair personal photos with vintage-style art prints that suit the home’s character.
Botanical illustrations, old maps, typography posters, or black-and-white architectural photography all feel at home in a space with original moulding and hardwood floors.
Seek out independent artists offering gallery-worthy designs at accessible prices to find genuinely beautiful, original work. The guiding principle is simple: hang what you love and edit as you go.
Ready-to-Hang Means Actually Ready
One of the most underrated features in home decor is pre-installed hanging hardware.
Frames that come with hardware already attached change the experience entirely, allowing you to spend your afternoon arranging art rather than making hardware store runs.
For first-time decorators, this reduction in friction is the difference between a project that gets finished and one that stays in the planning stage indefinitely.
Frames that stay securely on the wall while the art inside them changes offer immense flexibility.
Once your arrangement is set, you can swap seasonal prints, holiday photos, or updated family pictures without re-hanging a single thing. It is one of the smartest strategies for renters and busy households alike.
Key Insight: The secret to a professional-looking gallery wall isn’t symmetry; it’s variety. Mixing frame sizes and finishes creates a “collected over time” aesthetic that perfectly complements the natural character and history of older homes.
Add Seasonal Soul With Ribbon Accents
Why Ribbon Changes Everything
There is a distinct difference between a wall that has been decorated and a wall that has been styled. The gap between those two states is often texture, specifically something soft, dimensional, and a little unexpected that makes the eye slow down and linger.
Premium ribbon does that work better than almost anything else, and it accomplishes it without a single nail hole.
Specialty craft materials offer an extraordinary range of textures and seasonal colorways, from rich velvet and metallic finishes to sheer florals and classic burlap. High-quality wired materials hold their shape beautifully, ensuring bows stay full and loops remain intentional.
Best of all, using textiles on and around your walls is entirely non-permanent, seasonal, swappable, and endlessly flexible.
Four Simple Ways to Use Ribbon On and Around Your Walls
You can instantly elevate your home decor with a few simple styling touches. Use these four methods to incorporate ribbon creatively and seamlessly into your existing arrangements.
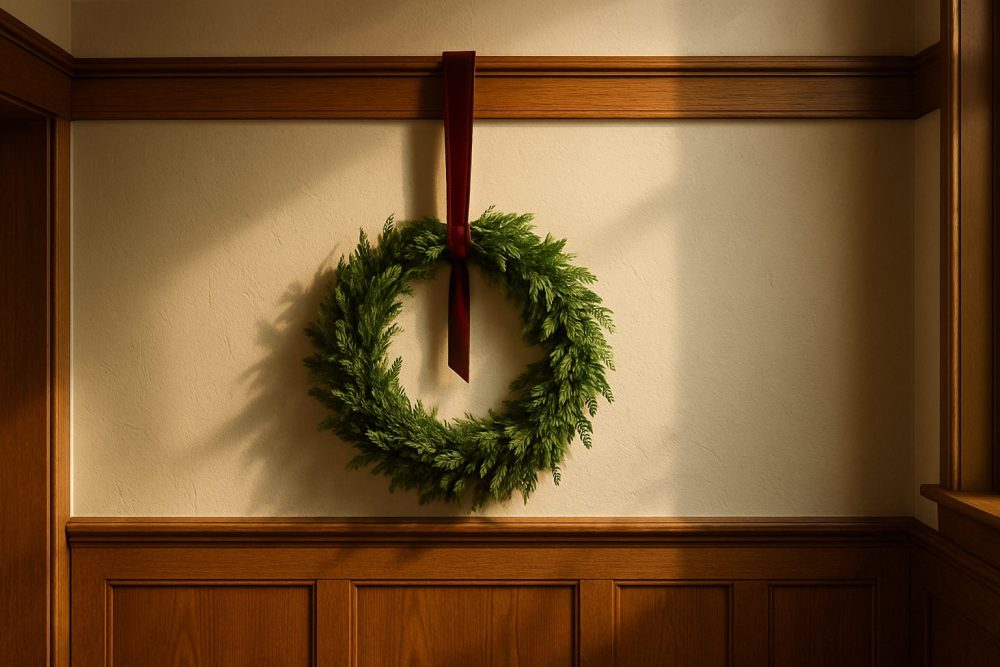
- Wreath Hangers
Loop a length of sturdy ribbon over a picture rail hook, a nail, or a decorative hook to suspend a seasonal wreath. Instantly, a blank stretch of wall becomes a focal point.
This technique works especially well in craftsman homes and bungalows where picture rail moulding is still intact. Change the wreath with the season while the suspension textile stays right where it is.
- Framed Textile Accents
You do not have to put a print inside every frame. Try weaving a length of textured fabric through a simple shadow box, or hang a single folded piece of velvet or burlap as a standalone accent.
It is an unexpected detail that adds dimension to a gallery layout and suits the tactile character of vintage home styling.
- Candlestick Dressing
Group a few candlestick holders on a console table or mantle shelf beneath your wall arrangement and tie a simple bow around the base of each one. It is a small gesture that creates enormous visual cohesion, connecting the shelving to the artwork above.
- Basket and Hook Styling
Wall-mounted baskets and hooks are practical, but they can feel utilitarian without a finishing touch. Tie a loop or a full bow around a handle or hook in an entryway or mudroom to make a functional wall feel carefully designed.
Seasonal Pairings to Keep in Mind
- Spring: Sheer florals and soft greens
- Summer: Crisp satin in white, navy, or coral
- Fall: Velvet burgundy, rust, and buffalo plaid
- Holiday: Metallic gold, deep red, or classic burlap with a wired edge
Pro Tip: Always opt for high-quality wired ribbon when styling walls. The internal wire allows you to sculpt perfect, voluminous bows that hold their shape and resist sagging, even in high-traffic areas like entryways.
Pull It All Together: Layout, Planning, and Plaster Wall Tricks
Plan Before You Pound (The Paper Template Method)
The single best habit to build before hanging anything is to trace each item onto kraft paper or newspaper, cut the shapes out, and tape them to the wall. This paper template method takes layout planning from guesswork to confidence.
Once your paper shapes are on the wall, you can move them around freely, step back from across the room, and live with the arrangement for a day before committing to a single hole.
In older homes with uneven surfaces or architectural features that interrupt wall space, this method is especially valuable.
Photograph the final arrangement on your phone before peeling off the templates to use as a hanging guide. Start with your largest piece at the center and build outward, leaving roughly two to three inches of breathing room between items.
Hanging on Plaster Walls Without the Drama
Plaster walls are a common source of decorating anxiety in older homes because they behave differently from modern drywall. However, they are entirely manageable with the right approach.
- Use picture rail hooks first: Many older homes still feature picture rail moulding near the ceiling. Hooks slide right in, allowing you to hang items at any height with zero damage to the plaster.
- Try adhesive strips for lighter items: Pieces with manageable weight are excellent candidates for quality adhesive strips. Follow the weight ratings carefully and allow full bonding time.
- Use plaster-specific anchors for heavier pieces: Standard drywall anchors will not grip properly in plaster. Look for anchors specifically rated for plaster walls, or locate a stud and drive directly into it.
- Always use a level: Even slightly tilted items are highly noticeable in a group arrangement. A small torpedo level takes seconds to use and saves considerable frustration.
Bringing Balance to the Finished Look
Once everything is up, step back and take it in. A gallery wall does not need to be perfectly symmetrical to feel balanced; it needs variation.
Alternate horizontal and vertical alignments, vary the sizes, and let soft textural accents below the wall echo colors from the art.
If something feels off, it usually comes down to items being too similar in size or a cluster that is too tightly packed. Adjustments are easy by moving one piece, adding a small item where the arrangement feels thin, or removing one where it feels crowded.
The goal is a wall that feels personal, warm, and lived-in, exactly like the rest of your home.
Warning/Important: Avoid using standard plastic drywall anchors on original plaster walls. They lack the necessary grip for brittle plaster and can cause significant cracking or crumbling. Always use anchors specifically rated for masonry or plaster.
Putting It All Together
Picture that charming old house again, with its original moulding, worn hardware, and floors with a story. Now, picture the walls finally matching that energy.
A well-planned arrangement built from mixed sizes and meaningful art, a neatly hung wreath catching light in the hallway, and soft seasonal accents on the console table below bring everything into focus.
That transformation does not require anything dramatic.
By utilizing accessible, ready-to-hang pieces, adding seasonal warmth with handcrafted textiles, and relying on paper templates to take the guesswork out of layout day, finishing a room becomes an enjoyable weekend project.
Start small if you need to, as one print you love or one beautifully styled hook in the hallway is all a space needs to begin feeling truly cared for. The walls will come together effortlessly.