About a third of homeowner insurance claims involve water damage. The typical claim costs north of $11,000 to fix. Most folks discover the issue way too late, after water has soaked through walls or seeped into the foundation.
The frustrating part is how preventable most of this damage turns out to be. You can dodge expensive repairs with a few smart projects around your property. Some take an afternoon. Others need a pro’s touch but still cost less than dealing with flooded basements or rotted framing down the road.

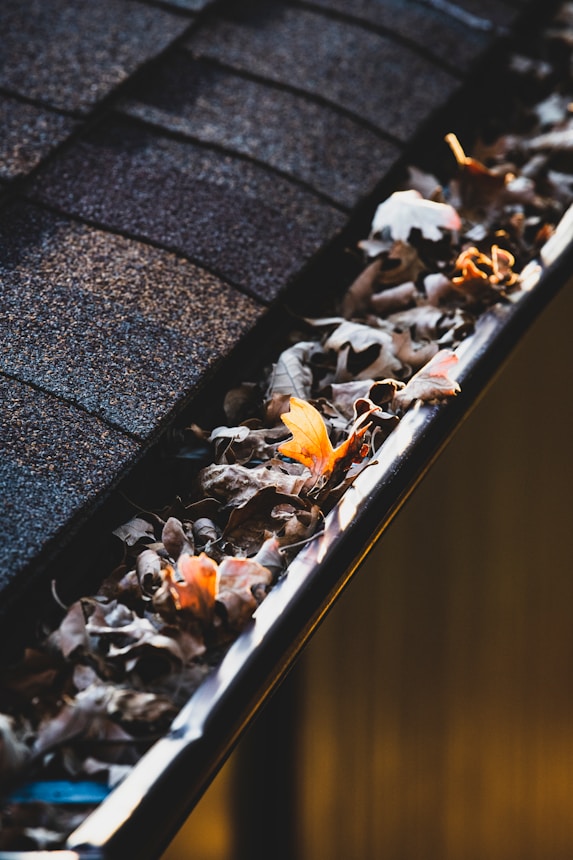
Get Your Gutters in Shape
Gutters move an insane amount of water away from your house each year. They’re basically your first defense against water problems. Once they clog up or fall apart, all that rainwater dumps right next to your foundation. It sneaks into basements. It soaks into crawl spaces. Plus, overflowing gutters trash your siding and rot out the fascia boards.
Clean them out twice a year, bare minimum. Late spring and mid-fall work well for most people. Scoop out all the decomposing leaf muck and stick debris. Then test your downspouts by running the garden hose through them. Grab a plumber’s snake if something’s jammed inside.
Check for damage while you’re already up there with the ladder. Rust eats through metal over time. Seams separate. Your gutters need to angle slightly toward the downspouts, roughly a quarter inch drop per ten feet of run. Sections hanging crooked probably have busted hangers.
DIY fixes only go so far though. Professional Gutter Repair becomes necessary for bigger jobs like replacing damaged sections or installing seamless systems. Those need specialized equipment you won’t have sitting in your garage. Pros also spot pitch problems that look fine from the ground but cause water to pool in the wrong spots.
Fix How Your Yard Slopes
Most people never think about their yard’s grade until water starts pooling where it shouldn’t. The slope of your dirt determines whether rain drains away properly or sits there soaking into your foundation.
Test Your Current Slope
Your ground should drop six inches over the first ten feet from your house. Sounds precise, but it’s easy to check. Lean a long board against your foundation and measure the gap at ten feet out.
Anything less than six inches means adding dirt. Buy clay-based fill, not topsoil. Regular topsoil erodes fast and doesn’t compact well. According to the USDA Natural Resources Conservation Service, you want to layer your fill about two inches deep at a time. Pack each layer down hard. Skipping this step leads to settling and those annoying dips that collect water anyway.
Target Known Problem Areas
Certain spots around every house create drainage headaches:
- Concrete meets foundation (driveways, walkways, patios)
- Right under downspouts that dump too close
- Natural low spots that become ponds after storms
- Planting beds built flush against the house
Sometimes you have to jackhammer out old concrete and repour it with the right slope. Not cheap, but compare that to what foundation repairs run and suddenly it seems reasonable.
Patch Up Entry Points
Water squeezes through the tiniest openings. A small crack this year grows bigger after a few freeze-thaw cycles. Catching these early saves you from major headaches.
Handle Cracks in Your Foundation
Walk your foundation perimeter twice yearly, both inside and outside your basement. Hunt for cracks wider than an eighth of an inch. The stable ones you can fix yourself. Wire brush them clean first. Pack them full of hydraulic cement or polyurethane filler designed for masonry. Both types puff up slightly as they cure, creating a flexible waterproof seal.
Tape across any fresh cracks and monitor them monthly. Growing cracks signal foundation movement. Those need a structural engineer’s assessment because caulk won’t solve shifting soil or drainage problems underneath your slab.
Protect Basement Window Wells
Window wells let daylight into basement rooms and work as fire escapes. They also catch every leaf and collect rainwater like buckets. Cover each well with clear polycarbonate. Rain stays out but light still gets through. The covers need to overhang the well edges by four inches minimum so wind-blown rain can’t sneak in.
Drop several inches of gravel in the well bottom. Water drains down into the gravel instead of pressing against your window. Wells that still flood during downpours need proper drainage pipes running to your yard’s drainage system or a standalone dry well.
Set Up Interior Alarms
Plenty of water damage starts behind walls or under appliances where you never see it developing. Early detection stops small leaks from becoming renovation projects.
Place battery-powered water sensors anywhere plumbing exists. Cluster them around water heaters, washing machines, dishwashers, and under bathroom and kitchen sinks. Basic models screech when moisture hits them. Nicer ones ping your phone even when you’re at work or on vacation.
Inspect every supply line and appliance hose twice per year. Rubber degrades even when it looks okay. Swap washing machine hoses every five years regardless. Spring for braided stainless steel replacements. They cost triple what rubber ones do but rarely fail and last way longer.
Test your sump pump each spring before heavy rains start. Dump a five-gallon bucket into the pit until the float trips. The pump should fire up automatically and blast water well away from your foundation, at least ten feet. Keep a battery backup unit handy for power outages during storms.
These projects work best as a system rather than picking just one. Start outside where you can redirect water before it reaches your house. Layer in the indoor detection as your safety net. A little prevention effort now beats tearing out soggy drywall and fighting mold later.