We made this easy DIY Dress up Storage Center for our daughter in only two days and for less than $60!

Guys, I am so excited about this post. This may be the cutest thing currently in our house. I can’t stop looking at it! So if you have little girls, you know that they love princess stuff. They need dresses, shoes, purses, tiaras, jewelry. And there is never too much. They NEED it all. Or maybe that’s just my little princess…
So while I love her having all her princess accessories, I hate that they are scattered all over the house. I can’t tell you how many times a day I hear “Mommy, Where is my light blue tiara with pink stones?” And of course I can only find the dark blue tiara because there is no centralized spot for all the dress up gear in our house. We have it here and there and it was really starting to drive me crazy.
With our little one’s birthday coming up, we knew it was the perfect time to make her something to organize all the princess stuff and of course I knew the wonderful girls over at Shanty 2 Chic would have plans for something great. Ryan and I had the best intentions and planned to start this at the beginning of February, giving us two weeks to get it done. Well of course life happens, stomach flues strike, and backs get thrown out, and next thing you know it’s two nights before your daughter’s birthday and you just have a pile of wood. Oops!!
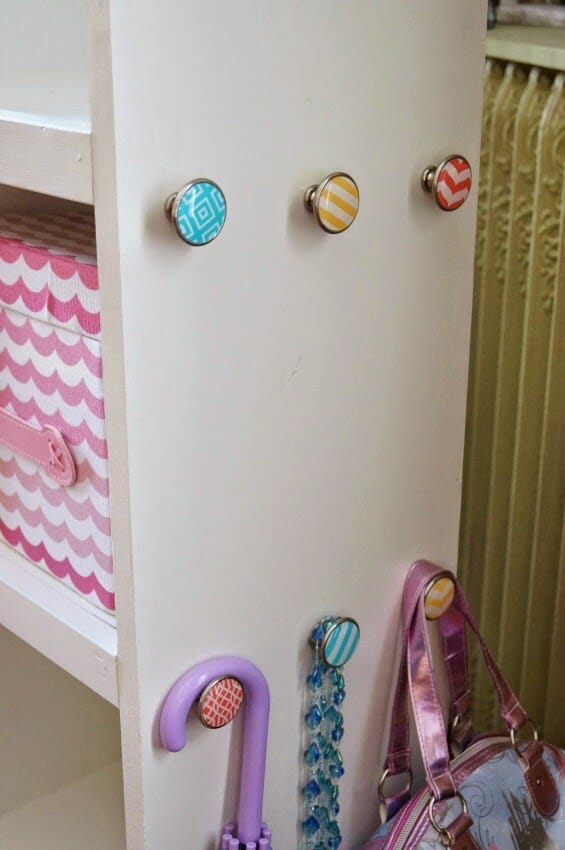
Needless, to say, we had to build this diy dress up storage center in a hurry. We hustled after bedtime for two nights in a row and got this done in about 6 hours total. It was honestly an easy build and the plans were so easy to follow. It was also very inexpensive. We spent less than $50 dollars total. We already had 2 of the 1X12’s, paint, and screws, so we didn’t need to purchase any of that. The most expensive part were the knobs on the side! I could have gone cheaper, but these were exactly what I was looking for, so I just went for it. The knobs are Home Decorator’s Collection from Home Depot and were $2.88 a knob. The bins are both from HomeGoods and I think they are adorable and girly.

Here’s what I love about this diy dress up storage cart. This side with the knobs is perfect for hanging purses, necklaces, umbrellas, etc. Hanging them keeps them out of the bins and all tangled up. The other side of the cart is empty for now, but I plan to add a mirror.
The shelf space is great for additional storage. I plan to put a tray on that top smaller shelf to hold miscellaneous items. The other two bins hold crowns, scarves, and other bigger accessories. I need to find one more bin to fit on that empty shelf. I had bought another, but forgot to account for the trim taking up space, so now it doesn’t fit.
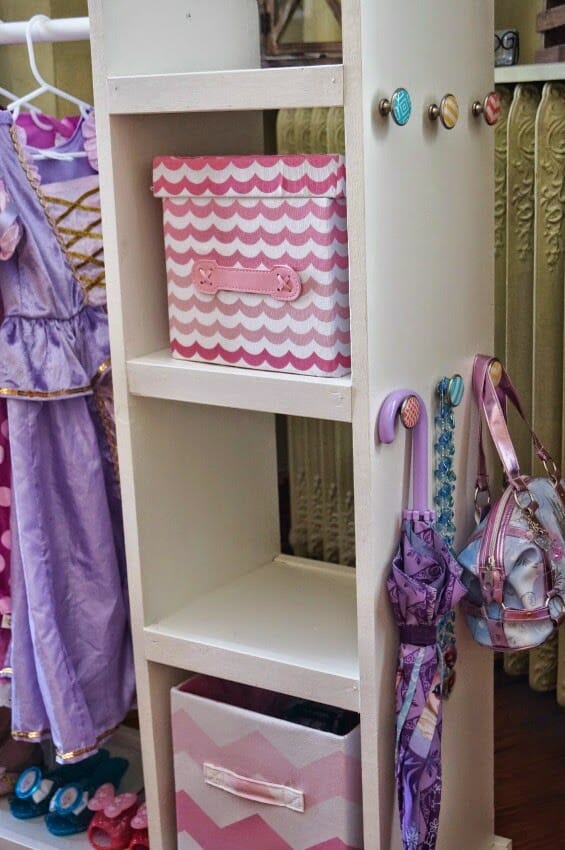
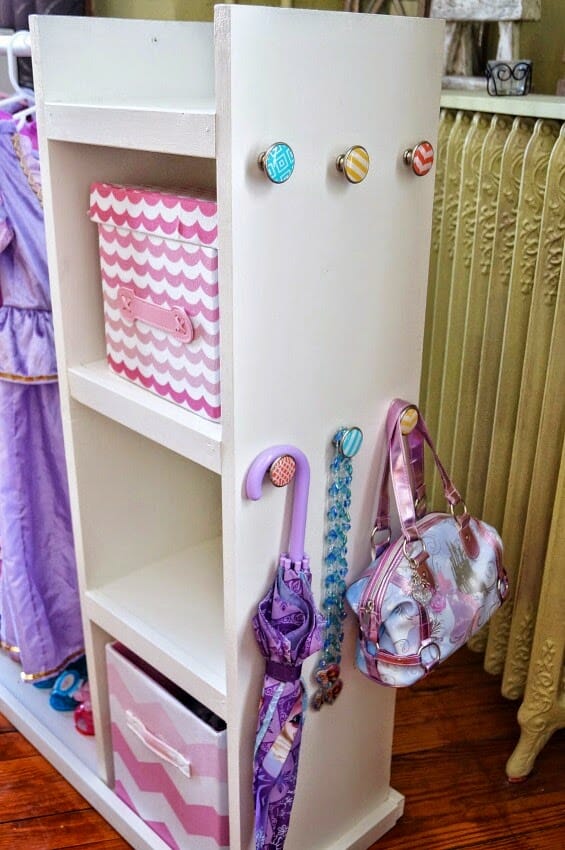
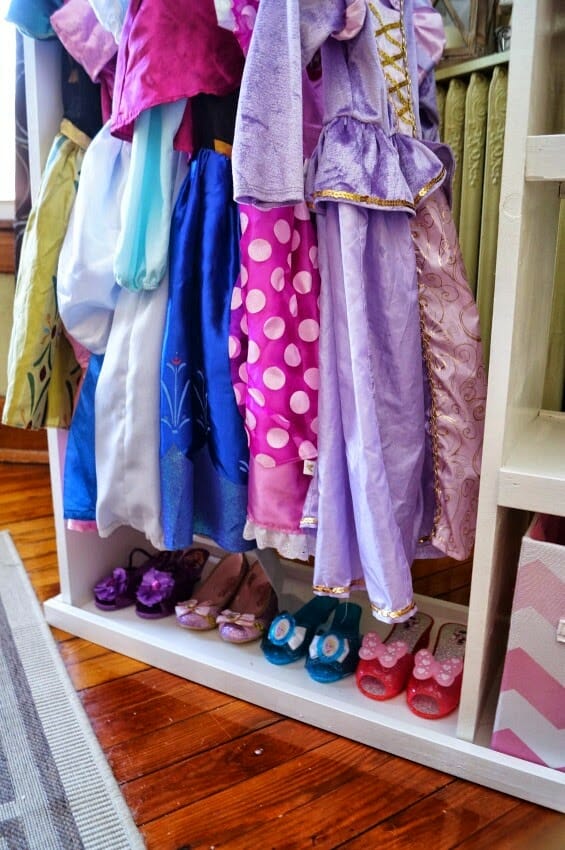
The bottom space, since it has a little lip from the trim, is perfect for dress up shoes. You can fit about 8 pairs of little shoes here!
So what does our little princess think of her DIY Dress Up Storage Center? She loves it and has taken to calling it her Princess Command Center, which I love! You should definitely give this a try if you have a little girl, don’t be afraid of building things from scratch! Once you get started, you’ll find it’s addicting and want to keep building!
How to build a dress up storage center?
I am going to share our tips, but for the step by step plans, please go here. We followed her tutorial exactly and found it very easy to follow. We did leave off the casters for now. I am still deciding if we want this to be mobile or not!
Tips for Building A DIY Dress Up Storage Center
1. Have your large pieces of wood cut at the store for you. Lowe’s does this free of charge and it will save you some time. The tutorial uses a large piece of plywood, but we went the route of the 1X12’s because we already had 2. By having Lowe’s cut these big pieces for us, it saved some time and ensured straight cuts.
2. Make sure the wood you buy is very straight. Bowed or crooked pieces are going to show gaps in your edges.
3. We used a Kreg Jig pocket hole tool for this, which I had bought for a previous project. If you plan on doing any furniture building, I really recommend this. It makes building projects much easier. The whole point of it is that it creates pocket holes in your wood which hide the hardware. In this project, the only screws you can see are the ones holding the dowel rod.
4. Caulking is your best friend. If you do end up with slightly bowed wood, caulking the shelf seams hide any gaps or crooked edges.
5. Use a paint with primer. We used White Dove by Benjamin Moore, color matched to Valspar’s Paint and Primer Ultra Paint. A paint with primer saves you a lot of time. The coverage on this paint was great and I only had to do one coat with some touch up.
6. The original plans glue the knobs into the side into predrilled holes. We just used the screws that came with the knobs. We screwed them in under each shelf so that the screws aren’t visible.
I hope you give this a try! It really was easy and has made life much more organized around here!
Looking for more easy DIY Projects?
DIY School Supplies and Craft Organizer
Easy DIY Children’s Book Shelves


It is nice to see such a great website with great content
This is the most wonderful dress up storage that I have ever seen! My daughter will love it! Thanks for sharing! It is more than lovely! 🙂 <3
Thank you so much! I hope your daughter loves it!
That is the cutest little “closet” ever!!! Love the pretty knobs!!!
Thank you! I love the knobs too! They were a little splurge, but worth it!
I love this idea! I bought an old dresser during winter and have been impatiently waiting for Spring to come. This weekend, it’s on! Thank you for the pointers =)
I have seen the cutest dressers turned into storage carts!! I bet yours will be awesome!
This is so adorable – I love it!! What a great idea!
LOVE IT! where did you find your storage cubes?
LOVE IT! where did you find the storage cubes? They are adorable!
Thank you! I got them all at HomeGoods. I love how they match, but aren’t too matchy! The handles also make it easy for my daughter to pull them out!
This is a beautiful dress-up storage. I am featuring this on my site if you don’t mind.
Thank you, my daughter loves it!! And thank you for featuring it!
Are there directions telling sizes to cut the boards. I would love to make this for my granddaughter’s birthday.
Hi Sue! I link to the plans with the cut list up in the post but here it is again incase you can’t find it! Plans here!
So cute! Such a smart idea!!
perfect! if only I had kids!
This is such a good idea! I have always struggled with how to organize dress up clothes for my kids. Typically a bin with them thrown in is all I can manage. This is a great way to keep them organized!
I tried using the bin method and it drove me crazy…this system is still working so well for us!
Love this idea!! now, if only I had a girl 😉 Was thinking about making some boy dress up storage (super hero, star wars … etc) but wouldn’t be nearly as pretty as all that pink!
It would still be so cute for a boy!!
OMG Your dress up storage is super cute! We made one for our kids for Christmas a few years back and it is still well used and loved. I love the shelves on the side for bins, so easy to hold everything together! Pinned.
Thanks Kati!!
I love it and I totally need something like this! Pinning!
adorable, great idea for your daughter cute stuff. very organized.
Maria
What a great idea! It’s perfectly thought out to include all the fun things a girl needs for dress up play. Love it!
Such a cute idea Amanda! You daughter will love this for years! Pinning!
Seriously, this is adorable, and I NEED it! Currently, all of our dress up clothes are housed in a big bin, but needless to say, they are strewn about in front of the bin right now. This is a great way to help the kids stay organized, and teach them life skills like hanging up laundry too! Pinning, and hopefully getting around to building one for our house one of these days!
Amanda, I need this in my life!!!!! So perfect. The knobs on the side are a great added touch! These girls and their dress up stuff! LOL
https://pic-collage.com/_avMVfzr4
A friend of mine made this for me & I can’t wait to see my daughter’s face on Christmas! Thank you for sharing your plans for it!
I bet your daughter is going to love it!
I like this web blog very much, Its a very nice spot to read and find info.
I delight in, result in I found exactly what I was having a look for.
You’ve ended my 4 day long hunt! God Bless you man. Have
a nice day. Bye
Fascinating, very nice sharing.
Hmm it appears like your website ate my first comment
(it was super long) so I guess I’ll just sum it up what I submitted and
say, I’m thoroughly enjoying your blog. I as well am an aspiring blog blogger but I’m still new to everything.
Do you have any tips for novice blog writers?
I’d really appreciate it.
I’ve recently started a web site, the information you offer on this site has helped me tremendously.
Thanks for all of your time & work.
Hello very nice blog!! Man .. Excellent .. Amazing .. I will bookmark your
site and take the feeds also…I’m happy to find numerous useful information here within the
publish, we need work out more techniques in this regard, thanks for sharing.
You have noted very interesting points! ps decent web site.
Perfect piece of work you have done, this website is really
cool with fantastic information.
Thanks for sharing superb informations. Your website is so cool.
I’m impressed by the details that you have on this blog.
It reveals how nicely you understand this subject.
Bookmarked this website page, will come back for more articles.
You, my pal, ROCK! I found just the info I already searched all over the place and just could not come across.
What a great web-site.
Some truly quality blog posts on this site, saved to favorites.
I am impressed with this web site, really I am a big fan.
Awesome post.
Enjoyed reading this, very good stuff, thanks.
That is a great tip especially to those fresh to the blogosphere.
Brief but very accurate information? Thanks for sharing this
one. A must read post!
I like this web blog it’s a master piece!
Glad I discovered this on google.
Excellent post. I am facing some of these issues as well..
Is the plan for this posted somewhere?
There is a link to the plans right above the tips section!
The link for the instructions isn’t working. Can you repost please? Or could you email them?
Here you go Diana! https://www.shanty-2-chic.com/2014/09/free-woodworking-plans-diy-dress-cart.html